SwiftUI 3.0 で追加された LocationButton を利用すると、タップするだけで位置情報の利用許可を求めるダイアログを自動で表示することができます。
また、ボタンの見た目も予め定義されたプロパティを指定するだけでそれらしいボタンになります。
【SwiftUI 3.0】LocationButton で「位置情報の利用許可」を簡単実装 & CLLocationManager で位置情報を取得
定義と使い方
CoreLocationUI のインポート
import CoreLocationUILocationButton の定義
LocationButton(title: LocationButton.Title?, action: (() -> Void))使用例
LocationButton(.currentLocation) {
    print("Get Location")
}
.foregroundColor(.white)- title: LocationButton.Title?:ボタンのタイトルを以下の何れかを指定します。
- .currentLocation:「Current Location」
- .sendCurrentLocation:「Send Current Location」
- .sendMyCurrentLocation:「Send My Current Location」
- .shareCurrentLocation:「Share Current Location」
- .shareMyCurrentLocation:「Share My Current Location」
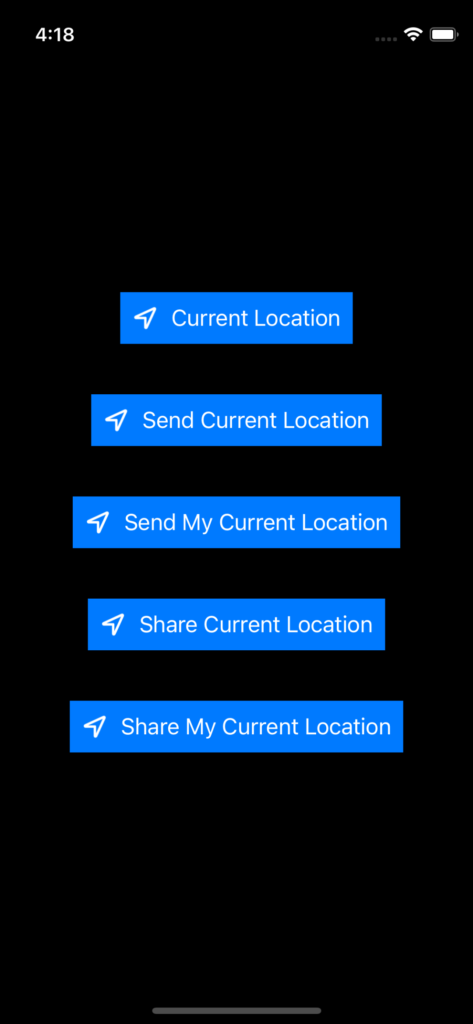
- action: (() -> Void) :ボタンを押下した際に行いたい処理を記述します。
ここで CLLocationManager を使って位置情報を取得すると良いと思います。
labelStyle プロパティ
.labelStyle を指定すると、アイコンのみ、タイトルのみ、アイコン&タイトルの何れかとすることができます。
LocationButton() {
}
.labelStyle(.iconOnly)
.labelStyle(.titleOnly)
.labelStyle(.titleAndIcon)
iconOnly にした場合の例
LocationButton {
}
.labelStyle(.iconOnly)
.foregroundColor(.white)
.cornerRadius(30)
.symbolVariant(.fill)
.tint(.blue)
補足ですが、通常の Button と同じで cornerRadius や tint を指定することもできます。
タップすると位置情報の利用許可ダイアログが表示される
LocationButton をタップすると、まだ位置情報の利用を許可していない場合に許可を求めるダイアログが表示されます。
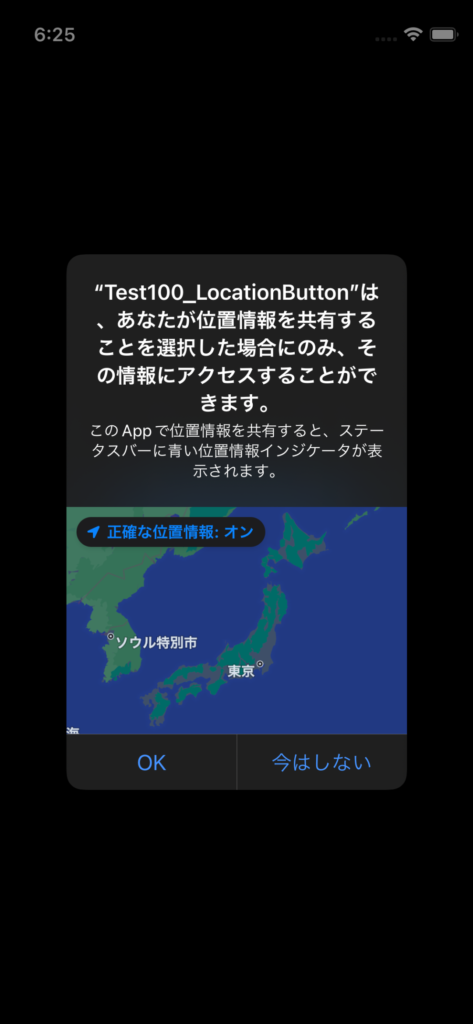
一度OKを選択すると出なくなります。ちなみに、もう一度試したい場合は設定アプリから「許可しない」に戻せばまた出るようになります。
設定 > プライバシー > 位置情報サービス > 対象のアプリを選択 > 許可しないをタップ
CLLocationManager で位置情報を取得
LocationButton そのものには位置情報を取得する機能はありません。位置情報を取得するにはCLLocationManager を使います。
LocationClient
位置情報を管理するクラスを作成しました。
import CoreLocation

class LocationClient: NSObject, ObservableObject, CLLocationManagerDelegate {

    let locationManager = CLLocationManager()

    @Published var location: CLLocationCoordinate2D?
    @Published var requesting: Bool = false

    override init() {
        super.init()
        locationManager.delegate = self;
    }

    func requestLocation() {
        request()
    }

    func locationManager(_ manager: CLLocationManager, didChangeAuthorization status: CLAuthorizationStatus) {
        request()
    }

    func locationManager(_ manager: CLLocationManager, didUpdateLocations locations: [CLLocation]) {
        location = locations.first?.coordinate
        requesting = false
    }

    func locationManager(_ manager: CLLocationManager, didFailWithError error: Error) {
        print(error.localizedDescription)
        requesting = false
    }

    private func request() {
        if (locationManager.authorizationStatus == .authorizedWhenInUse) {
            requesting = true
            locationManager.requestLocation()
        }
    }
}
CLLocationManager の requestLocation() メソッドで位置情報の取得をリクエストします。
位置情報取得の許可がされていないとエラーが発生するためステータスをチェックしてから実行しています。
private func request() {
    if (locationManager.authorizationStatus == .authorizedWhenInUse) {
        requesting = true
        locationManager.requestLocation()
    }
}
リクエスト結果の受け取り、位置情報取得の許可状況の変化の検知、エラーハンドリングなどを行うには CLLocationManagerDelegate プロトコルの以下の3つのメソッドを実装します。
func locationManager(_ manager: CLLocationManager, didChangeAuthorization status: CLAuthorizationStatus)
func locationManager(_ manager: CLLocationManager, didUpdateLocations locations: [CLLocation])
func locationManager(_ manager: CLLocationManager, didFailWithError error: Error)
今回の例では、先ほどの request() メソッドを 外部からの呼び出し用の requestLocation() と didChangeAuthorization で呼び出しています。
func requestLocation() {
    request()
}

func locationManager(_ manager: CLLocationManager, didChangeAuthorization status: CLAuthorizationStatus) {
    request()
}
位置情報の取得に成功すると didUpdateLocations が呼ばれ、locations 引数に緯度経度のデータが格納されています。
func locationManager(_ manager: CLLocationManager, didUpdateLocations locations: [CLLocation]) {
    location = locations.first?.coordinate
    requesting = false
}
LocationClient を使ったサンプル
LocationClient を @StateObject で画面側で保持し緯度経度を表示してみました。
import CoreLocationUI

struct ContentView: View {

    @StateObject var locationClient = LocationClient()

    var body: some View {
        VStack {
            VStack {
                Text("[位置情報]")
                if let location = locationClient.location {
                    Text("緯度:\(location.latitude)")
                    Text("経度:\(location.longitude)")
                } else {
                    Text("緯度:----")
                    Text("経度:----")
                }
            }
            LocationButton(.currentLocation) {
                locationClient.requestLocation()
            }
            .foregroundColor(.white)
            .cornerRadius(30)
            if (locationClient.requesting) {
                ProgressView()
            }
        }
    }
}
LocationButton のタップで位置情報の取得をリクエストしています。
リクエスト中は ProgressView が表示されるようにしておきました。
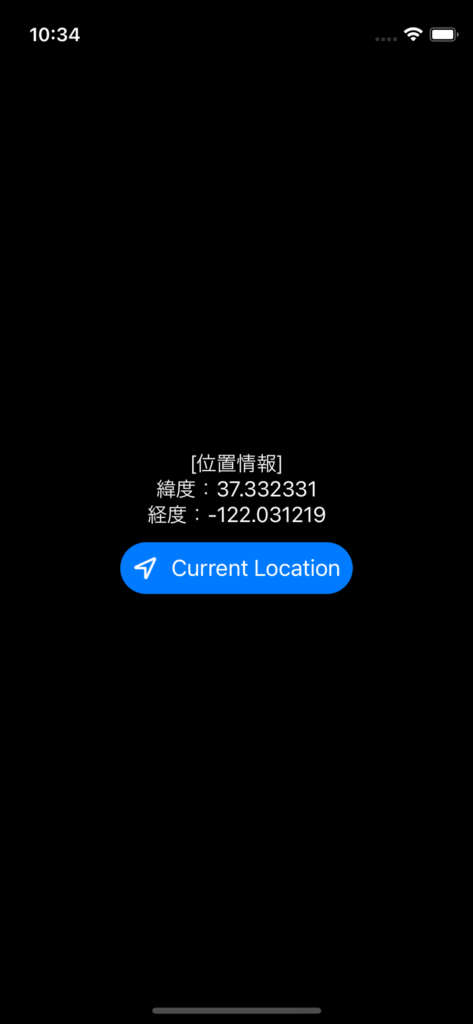
ちなみに、シミュレータで位置情報を利用するには、iOS Simulator メニューから、Features > Location から任意の場所をセットしておく必要がありますので注意してください。




macOS Monterey(12.2.1)
Xcode 13.2.1
iOS 15.3(iPhone 13 mini シミュレータ)